Monday, August 26, 2013

Time-Out for Mom: Knotted neckline shirt Tutorial

I saw a shirt like this online, but the tutorial was difficult for me to follow.  I sort of made up my own procedure.  I happened to have a gray Shade brand shirt in my closet that I rarely wore... because it's gray and I am not certain "how" to wear it.  This little knot improvement really made a nice detail and I love to wear the shirt now.
 So, I cut at an angle from the collar hem towards my right underarm area.  You can cut as low down the neckline as you wish the knot to be.
Then I decided that I needed to cut two little triangular pieces for me to be able to tie. So, I cut down from the tip of the collar area I had just cut.  on both sides of the cut.
 And I tied those little triangle pieces.
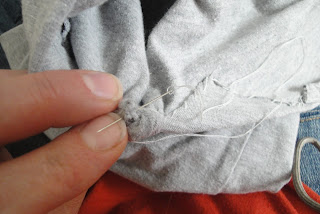
 Then I took one side of the tie and tucked it under and through the hole that formed after I made a knot.  See me holding the piece that I just tucked into the the hole and through into the inside area of the shirt?
 Then I tied those two little pieces again (over the knot).

 I cut most of the collar off the front of the shirt because it was too bulky to sew down on the inside of the shirt. 
 
I folded those large flaps of cloth into the inside area of the shirt and laid them flat against the shirt.  Then I blind stitched to hem down the flaps against the shirt so it laid smooth.  When I blind stiched, I just picked up the slightest bit of cloth so you can't see my stiching from the outside of the shirt.


 Here is what the stiching looked like from the inside.
 Turn the shirt right side out...Voila!

I was hesitant to try this out, but I used a shirt that I just don't really wear anyway and it made it easier for me to experiment.  I am so pleased with the end result!  I washed this once in the clothes washer with the rest of my clothes like normal and the stitching and knot held fine.  Go find a shirt you rarely wear and try this out!  You'll love it!

Monday, August 19, 2013

SMMART ART: Crayon Drizzle

We have had a wonderful and successful Summer Reading Group once again this summer!  There were 13 weeks of summer and each Monday, one of 13 Moms hosted our kids to read a book and share activities centered around that book.  Our kids did so many fun things this summer, including a teddybear picnic, making homemade icecream, meeting a real secret agent, learning about earthquake safety, making Native American birch bark buckets to collect maple syrup...You can read about past summer reading group experiences.

One mom shared this fun craft with the group. (We actually split up into a younger reading group P-2 and an older reading group 3-6grade since we had so many children who wanted to participate)

She hotglued crayons across the top of a thin canvas board.  You could use cardboard or the inside portion of a cereal box too.  Then she used a hairdryer to heat the crayons....and the wax drizzled to form a design.  She said that the kids were really excited about watching the colors weep and combine.


Thursday, August 15, 2013

SMMART SCIENCE: Science Video Clips

Trying to get my make-up on for the day and a barrage of little people flowed all around me...
I ran to my computer a few steps away and searched..."Science videos Kids".

Up popped this link: http://www.sciencekids.co.nz/videos.html 

The girls really are enjoying the Nature Videos...complete with a Venus Fly Trap attack, fast-motion growing HUGE lillypads and Mexican jumping beans (You have to see this one!).

Check them out!
mexican jumping bean photo: jbean mexican_jumping_bean__a_mb.gif                                    


Monday, June 24, 2013

SMMART Math: Computer Help

My daughter was given a worksheet with several websites to look at over the summer for educational learning fun.  I am very impressed with www.ixl.com/math!  You can choose your child's grade and then each math skill is categorized.  Click on a math skill and interactive math questions appear.  You need to check out this site!  Below is an example of the categorized math skills for 3rd grade:

Here is a list of all of the skills students learn in third grade! These skills are organized into categories, and you can move your mouse over any skill name to view a sample question. To start practicing, just click on any link. IXL will track your score, and the questions will automatically increase in difficulty as you improve!

This site gives you a few questions free, but does require a monthly fee, (which I don't particularly like), but it's a good site to see which math skills you can review in the summer.

www.ixl.com/math        

Monday, June 17, 2013

SMMART SCIENCE: World Science Festival

WHAT?!?!?!?  There is a World Science Festival in NewYork each year in June.  What a cool trip that would be...visit New York sights and attend the World Science Festival.  Definitely on the list now!

Spotlight on Science

At the World Science Festival, kids learn what it’s like to be a professional scientist
June 07, 2013 By TFK Kid Contributor Paloma Kluger
RICHARD B. LEVINE—NEWSCOM
World Science Festival participants star-gaze in Brooklyn Bridge Park, in New York City.
The World Science Festival gives kids a chance to get hands-on experience with science. The annual festival, which was held in New York City during the first week of June, began in 2008. This year’s event featured nine workshops that allowed kids to interact with scientists and learn more about what they do. TFK Kid Contributor Paloma Kluger attended three workshops: Oceanographer’s Apprentice, Roboticist’s Apprentice, and Food Scientist’s Apprentice.
Under the Sea
Before the Oceanographer’s Apprentice workshop, TFK talked to Dr. Kate Stafford, an oceanographer at the University of Washington. She explained her job: “Oceanographers study many different things about the ocean, including the physical currents, the chemistry, and the geology of the ground beneath the ocean,” Dr. Stafford told TFK.
It’s pitch black deep down in ocean waters. A technique called echolocation helps the animals use sound to "see" in the dark. The Oceanography workshop included an echolocation game. We also listened to recordings of different creatures in the Arctic Ocean. Finally, we made sea-creature sounds by blowing up balloons and letting the air out while squeezing or stretching the opening.
Paloma Kluger helps her team advance their robot along the path marked by a black line during a workshop at the World Science Festival.
COURTESY KLUGER FAMILY
Paloma Kluger helps her team advance their robot along the path marked by a black line during a workshop at the World Science Festival.
Meet the Robots
The Roboticist’s Apprentice Workshop featured Dr. Edward Olsen, a professor of robotics at the University of Michigan. He programs robots and gives them sensors so they can perform their jobs and missions, like search and rescue operations. Some can walk and some can move on wheels. It can take a long time to get the programming right. “If a robot runs into something, you know you’ve got more work to do,” Dr. Olsen said.
Teams of two got a small, toy-sized robot with wheels. Our job was to program it, first by waving it over a black line on a poster board, so its sensor would learn to recognize black and white. Next, we raced their robots along the black line, adjusting its switches to control its speed and sharpness on turns. The winning team’s time was 19 seconds.
Finally…All About Food
The last workshop was the Food Scientist’s apprentice workshop, led by Dr. Amanda Kinchla, a food scientist at the University of Massachusetts at Amherst. Dr. Kinchla is currently studying new and safer ways to wash vegetables, especially leafy greens like spinach. Different farmers use different methods to clean their vegetables. Some use something like a bathtub of water, others use big washing contraptions. “I am currently studying different farms in Massachusetts,” Dr. Kinchla said. “We want to make vegetables safer for consumers.”
Dr. Kinchla’s workshop included two educational food experiments and a taste-test of two drink samples, one red and the other blue. We rated the drinks on a scale of 1 to 9 for sweetness, fruitiness, and sourness. Most ranked the two drinks differently. In fact, their only difference was color. Would you have guessed that the appearance of a drink influences how you taste it? For scientists, such insights are all in a day’s work.
(http://www.timeforkids.com/news/spotlight-science/95851)
 

Monday, June 10, 2013

SMMART MATH: Math Worms

Such a cute idea from my daughter's preschool.  Math Worms! 
Easy enough to create a worksheet...
Just draw a curvy line and a circle at the end.  Help your Little by tracing the line with glue.  Then she can line up her cheerios along the line and count how many treats can sit on a line.  Then she can practice writing her numbers in the circle beside the line.  Or write a math problem underneath and she can place the correct number of cheerios on the line and write the answer.

Monday, June 3, 2013

SMMART SCIENCE: Pollination

pol·li·nate
[ póllə nàyt ]
  1. transfer pollen and fertilize plant: to transfer pollen grains from the male structure of a plant anther to the female structure of a plant stigma and fertilize it

Draw a bee on cardstock or find one to print from online and be sure to draw two bumps below the bee where you can cut out finger holes.  Draw and cut out two or more flowers (one per kid).

Place a cheesy cheeto in the center of a flower that you've drawn and cut out.  Let your little be fingers land on a cheeto flower center and then land on other flowers. You'll see how the "pollen" gets transfered from flower to flower.
 I found a few pollination videos on you tube:
Silence of the Bees Documentary:   http://www.youtube.com/watch?v=tiOeaa44a-Y
Pollen Stop Motion Movie: http://www.youtube.com/watch?v=zy3r1zlC_IU
Pollination song:  http://www.youtube.com/watch?v=V5yya4elRLw
Sesame Street:  http://www.youtube.com/watch?v=jhUfaGd-JC0&feature=endscreen&NR=1
(Cute little activity I've seen in a few places on the internet.)

Monday, May 27, 2013

SMMART SCIENCE: Magnets Guest Post


Cool and Useful Things You Can Do With Magnets
 

About the Author: Bruce Utsler is a freelance blogger who is currently studying to become an X-ray technician. He is an expert on magnets, particularly neodymium magnets. When he's not studying, Bruce likes to hit the streets on his longboard and to perfect his frisbee golf toss.

If you haven’t checked out some of the totally cool and extremely useful things you can do with powerful magnets, take a look at some of these suggestions.

Finding Wall Studs
One of the coolest and most useful real-world applications of super magnets is the ability to find studs in your wall. It’s not the actual stud itself that the magnet will be attracted to, but a nail or a screw in that stud instead. Once you find out where that is though, just follow a vertical line upward and hang whatever you need to hang—simple as that.

Taking Batteries Out
When I was a kid, my toys required batteries—and oftentimes, they required an infinite amount of them. I know for a fact that they take just as many today as they did back then, and that they are just as hard to remove after they die. That’s where the earth magnet comes in handy. Instead of risking a minor shock or a battery-acid-splattered puncture, just attach an earth magnet and pry that sucker out.

Make LED Throwies
LED Throwies are quickly becoming all the rage in and out of the graffiti world—originally used by graffiti artists and political activist supporting an agenda, they’ve quickly become the product of many DIY technology and decorating blogs because of their wide versatility not only as public decoration, but also as personal decoration. The best part about throwies? It’s only graffiti until you take it off the wall. The magnets allow you to place the throwies anywhere that there’s metal, and then remove them again to so it all over again somewhere else. Even better than that: they cost less than $1.00 each to make.

Homopolar Motor
Not many people know about the homopolar motor, but it truly is one of the simplest motors out there capable of producing 10,000 RPM, and made from nothing but:
·         One battery cell (C Battery)
·         Copper wiring
·         A Ferromagnetic  Screw
·         Neodymium magnet in disk shape

After placing the magnet on the head of the screw, and magnetically hanging the screw by its point from the tip of the positive end of the battery, touch one end of the copper wire to the negative surface of the battery. Keeping that end touching negative, touch the other end of the wire to the magnet at the head of the screw and voila! You have a homopolar motor!*
*The screw can actually get going up to 10,000 RPM and is capable of spinning out of control and potentially flying off of the battery. Take the proper precautions and wear safety glasses!

Chip Clips
By using two small rare earth magnets, you can completely replace the chip clips that keep open bags of Lays and such fresh. A word of caution—don’t swallow these magnets. It might sound silly, but super magnets have recently been the cause of life threatening injuries because of how they will attract to one another in different regions of the snaking intestinal tract. Eat the chips instead, they’re much tastier.
If you have any other cool ideas as to what you can do with magnets, feel free to leave suggestions in the comments section below!

LinkWithin

Related Posts with Thumbnails